Install ImageMagick and imagick on cPanel server
ImageMagick is an open source software suite to create, edit and convert bitmap images in various format. It provides a set of tools such as convert, animate, display, import etc for processing images. These tools can be used from a web site script to dynamically create or edit images. In this tutorial, we will show you how to install ImageMagick tools and imagick extension for PHP in a cPanel server.
Requirements
This installation is done on a CentOS 6 Linux server with cPanel. The commands shown here require root user access to the server.
Installing ImageMagick
ImageMagick package is available from CentOS base YUM repository. The ImageMagick development package is required to build imagick PHP extension later. Install ImageMagick and ImageMagick-devel packages using yum package manager:
yum install ImageMagick ImageMagick-devel -y
File system path of binary tools installed by ImageMagick package can be listed using rpm command:
rpm -ql ImageMagick | grep bin
/usr/bin/animate
/usr/bin/compare
/usr/bin/composite
/usr/bin/conjure
/usr/bin/convert
/usr/bin/display
/usr/bin/identify
/usr/bin/import
/usr/bin/mogrify
/usr/bin/montage
/usr/bin/stream
As you can see, the binary tools are installed in /usr/bin system directory.
Let us test the convert tool by doing a simple conversion of a PNG image to JPEG image. Download tux.png image from https://www.kernel.org/theme/images/logos/tux.png in the server using wget command:
wget https://www.kernel.org/theme/images/logos/tux.png
Use file command to display file type information of tux.png.
file tux.png
tux.png: PNG image data, 104 x 120, 8-bit/color RGBA, non-interlaced
Create a JPEG image tux.jpg by converting tux.png. Use convert tool:
convert tux.png tux.jpg
Use file command again to display file type information of tux.jpg:
file tux.jpg
tux.jpg: JPEG image data, JFIF standard 1.01
As you can see convert tool created a new JPEG file tux.jpg from the PNG file tux.png.
Installing imagick PHP extension
imagick is a native PHP extension to create and modify images using the ImageMagick library installed in the system. It can be installed from the PECL repository, http://pecl.php.net. For this, use pecl command:
pecl install imagick
The pecl command will ask for prefix of ImageMagick installation.
downloading imagick-3.1.2.tgz ...
Starting to download imagick-3.1.2.tgz (94,657 bytes)
.....................done: 94,657 bytes
15 source files, building
running: phpize
Configuring for:
PHP Api Version:         20090626
Zend Module Api No:      20090626
Zend Extension Api No:   220090626
Please provide the prefix of Imagemagick installation [autodetect] :
You just need to press ENTER here to autodetect Imagemagick installation. Then the process will continue to download imagick extension, build and install it. On successful completion, you should see a message similar to following:
Build process completed successfully
Installing '/usr/local/lib/php/extensions/no-debug-non-zts-20090626/imagick.so'
Installing '/usr/local/include/php/ext/imagick/php_imagick_shared.h'
Installing '/usr/local/include/php/ext/imagick/php_imagick.h'
Installing '/usr/local/include/php/ext/imagick/php_imagick_defs.h'
install ok: channel://pecl.php.net/imagick-3.1.2
configuration option "php_ini" is not set to php.ini location
You should add "extension=imagick.so" to php.ini
Then edit the system PHP configuration file /usr/local/lib/php.ini using your favorite text editor such as vi and and add following line to it:
extension=imagick.so
Restart apache web server to make sure that the newly installed imagick extension is available to PHP web scripts:
/scripts/restartsrv_httpd
To verify the imagick installation, create a PHP info file /usr/local/apache/htdocs/info.php with following code:
<?php phpinfo(); ?>
Change its ownership to nobody user:
chown nobody.nobody /usr/local/apache/htdocs/info.php
Open the URL http://server_ip_address/info.php (replace server_ip_address with IP address of your server) in your browser. Search for imagick in this page. If the extension is correctly loaded, you should see a section similar to following:
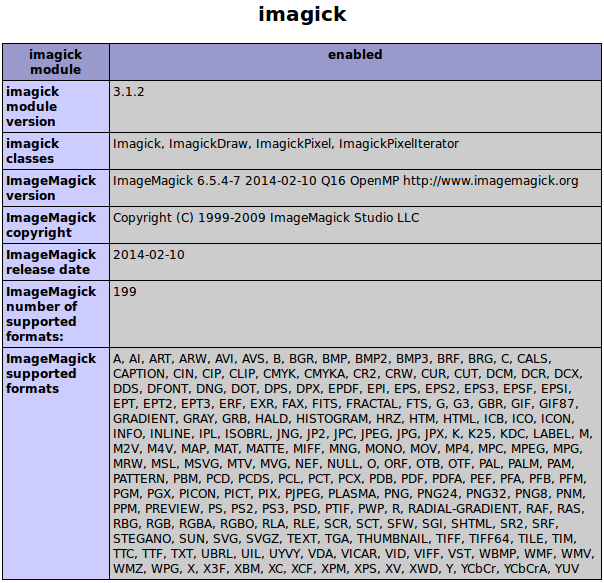
Remove the PHP info file after verifying imagick installation.
rm -f /usr/local/apache/htdocs/info.php
You should now be able to use ImageMagick tools and imagick PHP extension with your web scripts in the server.